Configuring iSCSI for Kubernetes
Estimated reading time: 10 minutesThis topic applies to Docker Enterprise.
The Docker Enterprise platform business, including products, customers, and employees, has been acquired by Mirantis, inc., effective 13-November-2019. For more information on the acquisition and how it may affect you and your business, refer to the Docker Enterprise Customer FAQ.
Internet Small Computer System Interface (iSCSI) is an IP-based standard that provides block-level access to storage devices. iSCSI takes requests from clients and fulfills these requests on remote SCSI devices. iSCSI support in UCP enables Kubernetes workloads to consume persistent storage from iSCSI targets.
iSCSI Components
- iSCSI Initiator – Any client that consumes storage and sends iSCSI commands. In a UCP cluster,
the iSCSI initiator must be installed and running on any node where pods can be scheduled.
Configuration, target discovery, and login/logout to a target are primarily performed
by two software components:
iscsid(service) andiscsiadm(CLI tool). These two components are typically packaged as part ofopen-iscsion Debian systems andiscsi-initiator-utilson RHEL/Centos/Fedora systems.iscsidis the iSCSI initiator daemon and implements the control path of the iSCSI protocol. It communicates withiscsiadmand kernel modules.iscsiadmis a CLI tool that allows discovery, login to iSCSI targets, session management, and access and management of theopen-iscsidatabase.
Note: iSCSI kernel modules implement the data path. The most common modules used across Linux distributions
are scsi_transport_iscsi.ko, libiscsi.ko and iscsi_tcp.ko. These modules need to be loaded on the host
for proper functioning of the iSCSI initiator.
- iSCSI Target – Any server that shares storage and receives iSCSI commands from an initiator.
Prerequisites
- Basic Kubernetes and iSCSI knowledge is assumed.
- iSCSI storage provider hardware and software set up is complete:
- Note: There is no significant demand for RAM/Disk when running external provisioners in UCP clusters. For setup information specific to a storage vendor, refer to the vendor documentation.
- Kubectl must be set up on clients.
- The iSCSI server must be accessible to UCP worker nodes.
Limitations
- Not supported on Windows.
Usage
The following steps are required for configuring iSCSI in Kubernetes via UCP:
Other information included in this topic:
- In-tree iSCSI volumes
- External provisioner and Kubernetes objects
- Authentication
- Troubleshooting
- Example
Configure iSCSI target
An iSCSI target can run on dedicated/stand-alone hardware, or can be configured in a hyper-converged manner to run alongside container workloads on UCP nodes. To provide access to the storage device, each target is configured with one or more logical unit numbers (LUNs).
iSCSI targets are specific to the storage vendor. Refer to the documentation of the vendor for set up instructions, including applicable RAM and disk space requirements, and expose them to the UCP cluster.
Exposing iSCSI targets to the UCP cluster involves the following steps:
- Target is configured with client IQNs if necessary for access control.
- Challenge-Handshake Authentication Protocol (CHAP) secrets must be configured for authentication.
- Each iSCSI LUN must be accessible by all nodes in the cluster. Configure the iSCSI service to expose storage as an iSCSI LUN to all nodes in the cluster. This can be done by allowing all UCP nodes, and essentially their IQNs, to be part of the target’s ACL list.
Configure generic iSCSI initiator
Every Linux distribution packages the iSCSI initiator software in a particular way. Follow the instructions specific to the storage provider, using the following steps as a guideline.
- Prepare all UCP nodes:
- Install OS-specific iSCSI packages and load the necessary iSCSI kernel modules. In the following
example,
scsi_transport_iscsi.koandlibiscsi.koare pre-loaded by the Linux distro. Theiscsi_tcpkernel module must be loaded with a separate command:- For CentOS/Red Hat systems:
sudo yum install -y iscsi-initiator-utils sudo modprobe iscsi_tcp - For Ubuntu systems:
sudo apt install open-iscsi
sudo modprobe iscsi_tcp
- For CentOS/Red Hat systems:
- Install OS-specific iSCSI packages and load the necessary iSCSI kernel modules. In the following
example,
- Set up UCP nodes as iSCSI initiators.
- Configure initiator names for each node as follows:
sudo sh -c 'echo "InitiatorName=iqn.<2019-01.com.example>:<uniqueID>" > /etc/iscsi/<initiatorname>.iscsi sudo systemctl restart iscsidNote: The
iqnmust be in the following format:iqn.YYYY-MM.reverse.domain.name:OptionalIdentifier.
- Configure initiator names for each node as follows:
Configure UCP
Using the instructions in the UCP configuration file help topic, update the UCP configuration file with the following options:
--storage-iscsi=true: enables ISCSI based Persistent Volumes in Kubernetes.--iscsiadm-path=<path>: specifies the absolute path of the iscsiadm binary on the host. Default value is “/usr/sbin/iscsiadm”.--iscsidb-path=<path>: specifies the path of the iscsi database on the host. Default value is “/etc/iscsi”.
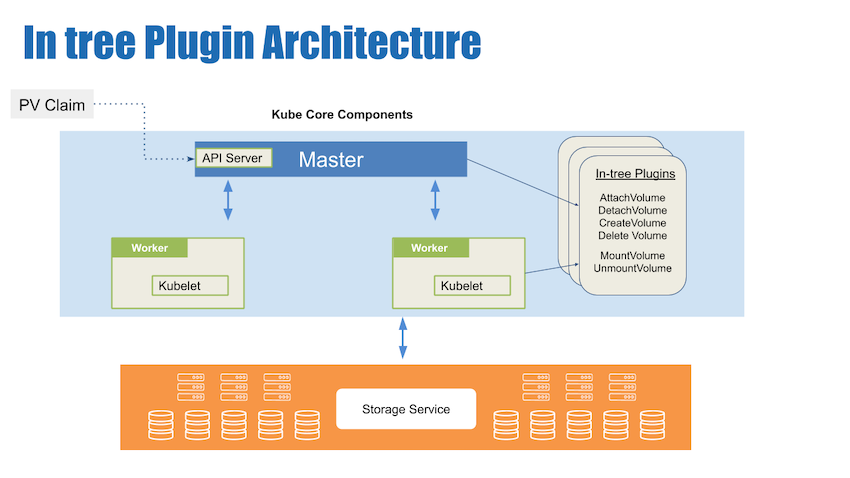
In-tree iSCSI volumes
The Kubernetes in-tree iSCSI plugin only supports static provisioning. For static provisioning:
- You must ensure the desired iSCSI LUNs are pre-provisioned in the iSCSI targets.
- You must create iSCSI PV objects, which correspond to the pre-provisioned LUNs, with the appropriate iSCSI configuration.
- As PVCs are created to consume storage, the iSCSI PVs bind to the PVCs and satisfy the request for persistent storage.
The following example shows how to configure and create a PersistentVolume object:
- Create a YAML file for the
PersistentVolumeobject:apiVersion: v1 kind: PersistentVolume metadata: name: iscsi-pv spec: capacity: storage: 12Gi accessModes: - ReadWriteOnce iscsi: targetPortal: 192.0.2.100:3260 iqn: iqn.2017-10.local.example.server:disk1 lun: 0 fsType: 'ext4' readOnly: false
Replace the following values with information appropriate for your environment:
12Giwith the size of the storage available.192.0.2.100:3260with the IP address and port number of the iSCSI target in your environment. Refer to the storage provider documentation for port information.iqn.2017-10.local.example.server:disk1is the IQN of the iSCSI initiator, which in this case is the UCP worker node. Each UCP worker should have a unique IQN. Replaceiqn.2017-10.local.example.server:disk1with a unique name for the identifier. More than oneiqncan be specified, but must be the following format:iqn.YYYY-MM.reverse.domain.name:OptionalIdentifier.- Create the
PersistentVolumeusing your YAML file by running the following command on the master node:kubectl create -f pv-iscsi.yml persistentvolume/iscsi-pv created
- Create the
External provisioner and Kubernetes objects
An external provisioner is a piece of software running out of process from Kubernetes that is responsible for creating and deleting Persistent Volumes. External provisioners monitor the Kubernetes API server for PV claims and create PVs accordingly.
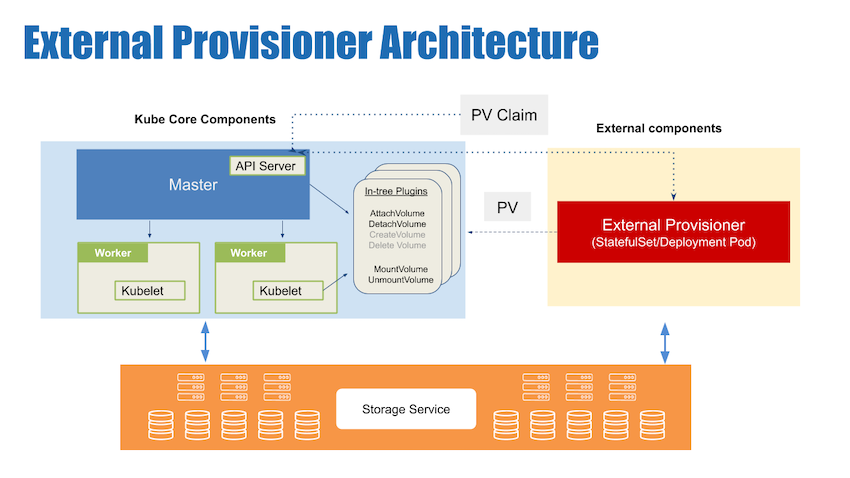
When using an external provisioner, you must perform the following additional steps:
- Configure external provisioning based on your storage provider. Refer to your storage provider documentation for deployment information.
- Define storage classes. Refer to your storage provider dynamic provisioning documentation for configuration information.
- Define Persistent Volume Claim(PVC) and Pod.
- When you define a PVC to use the storage class, a PV is created and bound.
- Start a Pod using the PVC that you defined.
Note: Some on-premises storage providers have external provisioners for PV provisioning to backend storage.
Authentication
CHAP secrets are supported for both iSCSI discovery and session management.
Troubleshooting
Frequently encountered issues are highlighted in the following list:
- Host might not have iscsi kernel modules loaded. To avoid this, always prepare your UCP worker nodes by installing the iSCSI packages and the iscsi kernel modules prior to installing UCP. If worker nodes are not prepared correctly prior to UCP install, prepare the nodes and restart the ‘ucp-kubelet’ container for changes to take effect.
- Some hosts have
depmodconfusion. On some Linux distros, the kernel modules cannot be loaded until the kernel sources are installed anddepmodis run. If you experience problems with loading kernel modules, make sure you rundepmodafter kernel module installation.
Example
- See https://github.com/kubernetes-incubator/external-storage/tree/master/iscsi/targetd for a reference external provisioner implementation using a target based external provisioner.
- On your client machine with
kubectlinstalled and the configuration specifying the IP address of a master node, perform the following steps:- Create and apply the storage class:
- Create a
StorageClassobject in a YAML file named `iscsi-storageclass.yaml, as shown in the following example:
kind: StorageClass apiVersion: storage.k8s.io/v1 metadata: name: iscsi-targetd-vg-targetd provisioner: iscsi-targetd parameters: targetPortal: 172.31.8.88 iqn: iqn.2019-01.org.iscsi.docker:targetd iscsiInterface: default volumeGroup: vg-targetd initiators: iqn.2019-01.com.example:node1, iqn.2019-01.com.example:node2 chapAuthDiscovery: "false" chapAuthSession: "false"- Use the
StorageClassYAML file and run the following command. ``` $ kubectl apply -f iscsi-storageclass.yaml storageclass “iscsi-targetd-vg-targetd” created
$ kubectl get sc NAME PROVISIONER AGE iscsi-targetd-vg-targetd iscsi-targetd 30s ```
- Create a
- Create and apply a PersistentVolumeClaim
- Create a
PersistentVolumeClaimobject in a YAML file namedpvc-iscsi.ymlon the master node, open it in an editor, and include the following content:kind: PersistentVolumeClaim apiVersion: v1 metadata: name: iscsi-claim spec: storageClassName: "iscsi-targetd-vg-targetd" accessModes: - ReadWriteOnce resources: requests: storage: 100Mi
Supported
accessModesvalues for iSCSI includeReadWriteOnceandReadOnlyMany. You can also change the requested storage size by changing thestoragevalue to a different value.Note: The scheduler automatically ensures that pods with the same PersistentVolumeClaim run on the same worker node.
- Apply the
PersistentVolumeClaimYAML file by running the following command on the master node:kubectl apply -f pvc-iscsi.yml -n $NS persistentvolumeclaim "iscsi-claim" created
- Create a
- Verify the
PersistentVolumeandPersistentVolumeClaimwere created successfully and that thePersistentVolumeClaimis bound to the correct volume: ``` $ kubectl get pv,pvc
NAME STATUS VOLUME CAPACITY ACCESS MODES STORAGECLASS AGE iscsi-claim Bound pvc-b9560992-24df-11e9-9f09-0242ac11000e 100Mi RWO iscsi-targetd-vg-targetd 1m
NAME CAPACITY ACCESS MODES RECLAIM POLICY STATUS CLAIM STORAGECLASS REASON AGE pvc-b9560992-24df-11e9-9f09-0242ac11000e 100Mi RWO Delete Bound default/iscsi-claim iscsi-targetd-vg-targetd 36s ```
- Set up pods to use the
PersistentVolumeClaimwhen binding to thePersistentVolume. Here aReplicationControlleris created and used to set up two replica pods running web servers that use thePersistentVolumeClaimto mount thePersistentVolumeonto a mountpath containing shared resources.- Create a ReplicationController object in a YAML file named
rc-iscsi.ymland open it in an editor to include the following content:apiVersion: v1 kind: ReplicationController metadata: name: rc-iscsi-test spec: replicas: 2 selector: app: nginx template: metadata: labels: app: nginx spec: containers: - name: nginx image: nginx ports: - name: nginx containerPort: 80 volumeMounts: - name: iscsi mountPath: "/usr/share/nginx/html" volumes: - name: iscsi persistentVolumeClaim: claimName: iscsi-claim - Use the ReplicationController YAML file and run the following command on the master node:
$ kubectl create -f rc-iscsi.yml replicationcontroller "rc-iscsi-test" created - Verify pods were created:
 $ kubectl get pods
 NAME                  READY     STATUS    RESTARTS   AGE
 rc-iscsi-test-05kdr   1/1       Running   0          9m
 rc-iscsi-test-wv4p5   1/1       Running   0          9m
- Create a ReplicationController object in a YAML file named
- Create and apply the storage class: